Vanilla Shortbread Christmas Tree Stack

IMG_20181202_145022_resized_20181206_013022899Ingredients: (you will also need various sized star cookie cutters)

Shortbread:

  • 250g/9oz plain flour
  • 75g/2.6oz caster sugar
  • 175g/6oz butter
  • 1 1/2 teasp vanilla essence

Icing:

  • 200g/7oz icing sugar
  • 5 teasp cold water
  • Green food colouring
  • Coloured sprinkles

Method:

  1. Pre-heat oven to 180 degrees (c), gas mark 4, 350 degrees (f).
  2. Mix flour & sugar together in a bowl.
  3. Add butter & rub together until a breadcrumb like texture is formed & add vanilla essence.IMG_20181130_141047_resized_20181202_025243999
  4. Knead into a dough.IMG_20181130_141400_resized_20181202_025243212
  5. Roll out the dough.IMG_20181130_141544_resized_20181202_025243736
  6. Using your various sized star shaped cookie cutters, cut out your stars ( making sure that you have multiples of each size star)IMG_20181130_142314_resized_20181202_025242830
  7. Place on a lined baking tray & bake in the oven for 20 minutes or until golden brown.IMG_20181130_142258_resized_20181202_025243445
  8. When baked, remove from the oven & allow to cool.
  9. Add icing sugar to bowl & gradually add your cold water.IMG_20181202_133103_resized_20181206_013022183
  10. When your icing forms a paste you can add your green food colouring & mix well.IMG_20181202_133245_resized_20181206_013021952
  11. Starting with the larger star cookies, dip them into the icing mixture, allow any excess icing to run off & then place down on a flat chopping board.IMG_20181202_133329_resized_20181206_013020821
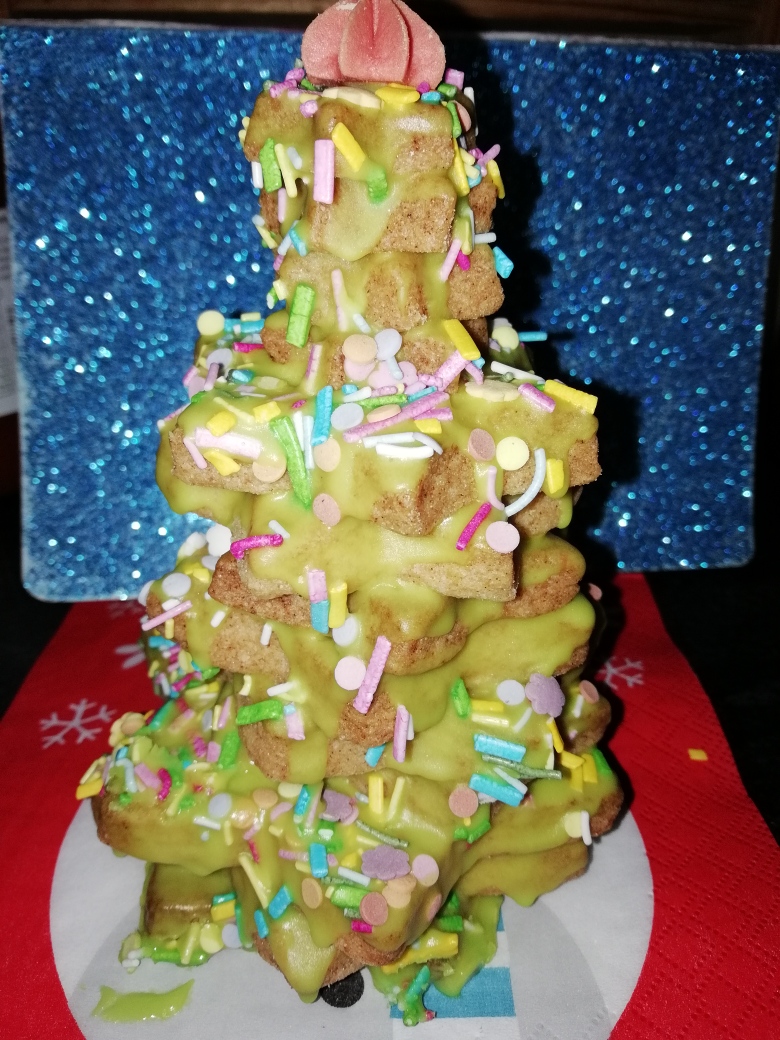
  12. Continue this process with all of the cookies (as you are stacking them twist them slightly so that the points of the stars are pointing different directions, this will allow the tree shape to form)IMG_20181202_133353_resized_20181206_013021709
  13. When your tree is fully stacked , throw on your sprinkles & a star topper.IMG_20181202_133810_resized_20181206_013022590
  14. Allow to dry.IMG_20181202_145022_resized_20181206_013022899

Enjoy & have a very Merry Christmas & a healthy, happy New Year.


Christmas Clothes Peg Decorations

IMG_20181130_104147_resized_20181130_104249434Supplies:

  • Wooden clothes pegs
  • Paint
  • Accessories (googly eyes, glitter, buttons etc. whatever you wish to design your pegs)
  • Newspaper
  • PVA glue

Method:

  1. Lay down your newspaper & gather your plain wooden pegs to be painted.IMG_20181129_145038_resized_20181130_104248087
  2. Paint your pegs the colour of your character (ie: red for Santa, brown for Rudolph etc) allow one side to dry & then paint the other side.IMG_20181129_150019_resized_20181130_104247762
  3. Add your accessories , I used googly eyes, sequins,beads & foam stickers (these would all be available from your local discount store)
  4. Allow to dry.
  5. Hang up your decorations & enjoy.

Have a very merry Christmas & healthy, happy New Year!


Christmas Biscuit Cake

IMG_20181126_161540_resized_20181126_041920273Ingredients:

  • 225g/8oz dark chocolate
  • 113g/4oz butter
  • 1 tin condensed milk
  • Dried cherries
  • digestive biscuits
  • dried fruit mix
  • Chopped walnuts

(you can vary the dried ingredients , put in whatever you want & as much or as little as you want)

Method:

  1. Line a baking tray/dish with cling film.IMG_20181123_185214_resized_20181126_041851905
  2. Gather all of your dry ingredients together in a bowl.IMG_20181123_185101_resized_20181126_041851584
  3. Melt your dark chocolate, butter & condensed milk in a plastic bowl over a pot of boiling water. (Bakers tip: do not let the bowl sit into the water as this can burn the ingredients).IMG_20181123_184429_resized_20181126_041849259
  4. When the mixture is completely melted remove from the heat.IMG_20181123_185802_resized_20181126_041849957
  5. Add your dry ingredients to the melted mixture.IMG_20181123_185845_resized_20181126_041851248
  6. Mix well to ensure that all dry ingredients are coated.IMG_20181123_190135_resized_20181126_041852273
  7. Transfer to baking tray/dish.IMG_20181123_190231_resized_20181126_041850639
  8. Cover in cling film & allow to set in the fridge, I usually leave it over night.IMG_20181123_190322_resized_20181126_041850267
  9. Serve as you wish, sliced or in bite size pieces.  This can be kept int he fridge for up to 3 weeks once it is fully covered.IMG_20181126_161622_resized_20181126_041921414

Enjoy & have a very Merry Christmas & a healthy, happy New Year!


Clay Christmas Ornaments

IMG_20181121_130453_resized_20181122_050344463Supplies:

  • Air-dry clay
  • Straw
  • Paint
  • Ribbon
  • Newspaper
  • Accessories (glitter, gems etc)

This craft can also be made with salt-dough instead of air-dry clay.  My salt-dough ornament blog post can be found below

Salt Dough Halloween Hanging Decoration or Garland

Method:

  1. Roll out your air-dry clay onto newspaper, to the thickness that you want your ornaments to be.IMG_20181117_125726_resized_20181122_050228560
  2. Using Christmas cookie cutters, cut out your ornaments. (wash cookie cutters thoroughly after use on clay).IMG_20181117_125802_resized_20181122_050227435
  3. Using a straw poke a hole through your ornaments, ribbon will be put through later on to hang your ornaments.IMG_20181117_130424_resized_20181122_050227078
  4. Allow to dry for a day or two.IMG_20181117_130509_resized_20181122_050227885
  5. When fully dried, paint the front of your ornaments, when the front is fully dried, paint the back of the ornaments.
  6. When the paint is fully dried add on whatever accessories you wish.  You can even just leave them painted.IMG_20181121_130453_resized_20181122_050344463
  7. String ribbon through your ornaments & hang.IMG_20181122_165721_resized_20181122_050344166

Enjoy your stunning homemade ornaments & have a Merry Christmas & a healthy, happy New Year!

My Countdown To Christmas Movie Checklist

ball blur bokeh bright
Photo by Bob SpringBob54 on Pexels.com


Hey guys,

I know this isn’t my usual food recipe or craft tutorial but………

With Christmas just around the corner I thought I would come on here & share with you guys my top favourite Christmas films that I love to watch with my family, like a sort of “Countdown to Christmas”,  There is a few movies on my list that totally made Christmas for me as a child & am so looking forward to sharing my childhood favourites with my little girl.  I hope you guys enjoy !


  1. The Grinch  (2000)
  2. Jack Frost (Get your tissues at the ready, I cry every time)
  3. The Santa Clause
  4. Deck The Halls
  5. Arthur Christmas (I only found this one last year & I fell in love with it straight away)
  6. Buster & Chauncey’s Silent Night (This one is the epitome of my childhood at Christmas.  My brother, sister & I would watch this every Christmas Eve in our new PJ’s with hot chocolate and Fererro Rochers before heading to bed.)
  7. Polar Express (Tom Hanks, enough said!)
  8. Call Me Clause
  9. Miracle on 34th Street (1994)
  10. Jingle All The Way
  11. Christmas with The Kranks
  12. Muppets Christmas Carol (CLASSIC!)
  13. Mickeys Christmas Carol (I’m so excited to watch this with my little girl this year, she LOVES mickey mouse)
  14. Elf
  15. Home Alone (Keep the change you filthy animal)
  16. Rise of the Guardians

And of course it isn’t Christmas day without sitting with a full belly in front of the Mrs.Brown’s Christmas Special.


I hope you guys enjoy this list as much as I will & if you follow me on Instagram let me know what your must see Christmas movies are!


Have a very Merry Christmas & a healthy, happy New Year! 


Broccoli Soup (Baby friendly)

IMG_20181112_162351_resized_20181114_055306927Ingredients:

(With this recipe use as much or as little of the ingredients as you wish, depending on how much soup you wish to make.)

  • Potato
  • Broccoli
  • Onion
  • Garlic
  • Butter
  • Vegetable stock cube (I used Boots baby stock cubes)
  • Water

Method:

  1. Wash, peel & chop potatoes, wash broccoli & chop up.
  2. Chop an onion, mince garlic & set aside.
  3. Melt butter in a pan & lightly fry off your potato, onion & garlic.IMG_20181112_153844_resized_20181114_055307602
  4. Add Water & stock cube to the pot (enough to cover your ingredients) boil on a high heat.IMG_20181112_154350_resized_20181114_055308343
  5. When the water starts to boil add your broccoli.IMG_20181112_155016_resized_20181114_055307275
  6. When all of your veg is nice and soft, blend in a blender/hand-blender, or serve chunky. I blend mine in order for it to be easier for the little one to eat.IMG_20181112_162345_resized_20181114_055307989

I hope you enjoy this easy hearty soup on these cold winter days.


Millionaire Shortbread

IMG_20181110_210009_resized_20181110_093540366Ingredients:

  • 250g/9oz plain flour
  • 75g/2.6oz caster sugar
  • 175g/6oz butter
  • Tinned caramel
  • 1 bar plain chocolate

Method:

  1. Pre-heat oven to 180 degrees (c), gas mark 4, 350 degrees (f).
  2. Mix flour & sugar together in a bowl.IMG_20181110_153601_resized_20181110_093451294
  3. Add butter & rub together until a breadcrumb like texture is formed.IMG_20181110_154314_resized_20181110_093451619
  4. Knead into a dough.IMG_20181110_154849_resized_20181110_093452708
  5. Flatten dough into a lined baking tray. (Bakers Tip: you can use a long thin glass/tumbler to roll it out evenly).img_20181110_155050_resized_20181110_093452001.jpg
  6. Bake in the oven for 20 minutes or until golden brown.
  7. When it is baked set aside to cool.img_20181110_163655_resized_20181110_093452303.jpg
  8. When your shortbread is cooled add your tinned caramel & set aside in the the fridge to harden.IMG_20181110_172534_resized_20181110_093449914
  9. Melt cooking chocolate & add on top of your caramel layer, again set aside in the fridge to cool.IMG_20181110_181752_resized_20181110_093450247
  10. When it is fully cooled & hardened cut into pieces.IMG_20181110_205945_resized_20181110_093539406

Enjoy !IMG_20181110_205926_resized_20181110_093540692

Carrot & Parsnip Soup (baby friendly)

Close-up of radish and  carrots on table : Stock Photo

(image above courtesy of gettyimages)

Ingredients:

(With this recipe use as much or as little of the ingredients as you wish, depending on how much soup you wish to make.  In this case I was making a big batch to freeze for my little one & I to use at a later date)

  • Potato
  • Carrot
  • Parsnip
  • Onion
  • Garlic
  • Butter
  • Vegetable stock cube (I used Boots baby stock cubes)
  • Water

Method:

  1. Wash, peel & chop potatoes, carrots & parsnips.IMG_20181021_143537_resized_20181104_042640495
  2. Chop an onion, mince garlic & set aside.IMG_20181021_144149_resized_20181104_042638286
  3. Melt butter in a pan & lightly fry off your potato, onion & garlic.IMG_20181021_144638_resized_20181104_042640110
  4. Add Water & stock cube to the pot (enough to cover your ingredients).
  5. When the water starts to boil add your carrots & parsnips.IMG_20181021_145325_resized_20181104_042639689
  6. When all of your veg is nice and soft, blend in a blender/hand-blender, or serve chunky. I blend mine in order for it to be easier for the little one to eat. IMG_20181021_170330_resized_20181104_042638784

I hope you enjoy this easy hearty soup on these cold winter days.


Hocus Pocus Book Brownies

IMG_20181029_181703_resized_20181031_103705125Ingredients:

  • 400g/14oz sugar
  • 225g/8oz melted butter
  • 100g/4oz cocoa powder/drinking chocolate
  • 1tso vanilla essence
  • 4 eggs
  • 225g/8oz plain flour
  • 1/2 tsp baking powder
  • Pinch of salt
  • Cooking chocolate (as much or as little as you wish)
  • Candy eyes

Method:

  1. Pre-heat oven to 180 degrees (c), gas mark 4, 350 degrees (f).
  2. Melt butter & mix together with sugar.IMG_20181029_145805_resized_20181031_103550985
  3. Add your eggs, cocoa powder/drinking chocolate, vanilla essence & mix well.IMG_20181029_145949_resized_20181031_103554026
  4. Add your flour, baking powder & pinch of salt & mix well.IMG_20181029_150419_resized_20181031_103554840
  5. When it is well mixed pour into a lined baking tray.IMG_20181029_151641_resized_20181031_103550605
  6. Cook in the oven for 20 to 25 minutes.
  7. Allow to cool.IMG_20181029_172244_resized_20181031_103554453
  8. When cooled cut into individual slices.IMG_20181029_174014_resized_20181031_103553595
  9. Decorate your book with melted chocolate.
  10. Add a candy eye.

Enjoy & have a happy Halloween!

Halloween Candle Jars

IMG_20181025_205205_resized_20181025_095218650Supplies:

  • Old baby food jars/ candle jars
  • Sticky labels
  • Paint
  • Candles

Method:

  1. Pick out the size jar you would like to use.IMG_20181025_162334_resized_20181025_095217311
  2. Get your roll of sticky labels.IMG_20181025_162447_resized_20181025_095222082
  3. Write out the Halloween word/phrase you want on your candle jars ( in this case I chose “Boo”)IMG_20181025_162616_resized_20181025_095220991
  4. Stick the labels onto the jars.IMG_20181025_163136_resized_20181025_095219033
  5. Paint your jars whatever colour you want & place upside down to dry.IMG_20181025_163641_resized_20181025_095218175
  6. When your jars are full dry peel off the sticky label.IMG_20181025_183905_resized_20181025_095219425
  7. Stick in you tea lights (put them out of reach of little hands) or use LED tealights.IMG_20181025_214856_resized_20181025_095221709

Enjoy!

Design a site like this with WordPress.com
Get started