Papier Maché Candy Bowls

Supplies:

  • Balloon
  • Vaseline
  • PVA glue
  • Water
  • magazine/newspaper/toilet roll
  • Paint/ acrylic paint
  • Paintbrushes
  • cupcake/muffin tray

Method:

  1. Blow up your balloon to the size that you want your bowl to be.IMG_20181024_123937_resized_20181025_095034916
  2. Apply a thin layer of Vaseline to the balloon. (This will make the balloon easier to remove at the end).
  3. In a container mix a small amount of water with PVA glue.
  4. Add pieces of magazine/newspaper/toilet roll to the balloon & glue them down, do this until the balloon is 3/4 of the way covered.IMG_20181024_133035_resized_20181025_095035615
  5. You can add more layers if you wish  (This will make the bowl thicker & sturdier) then place the balloons into a cupcake/muffin tray to dry. IMG_20181024_133042_resized_20181025_095037466
  6. When it is fully dry, pop the balloon & remove it from the bowl.
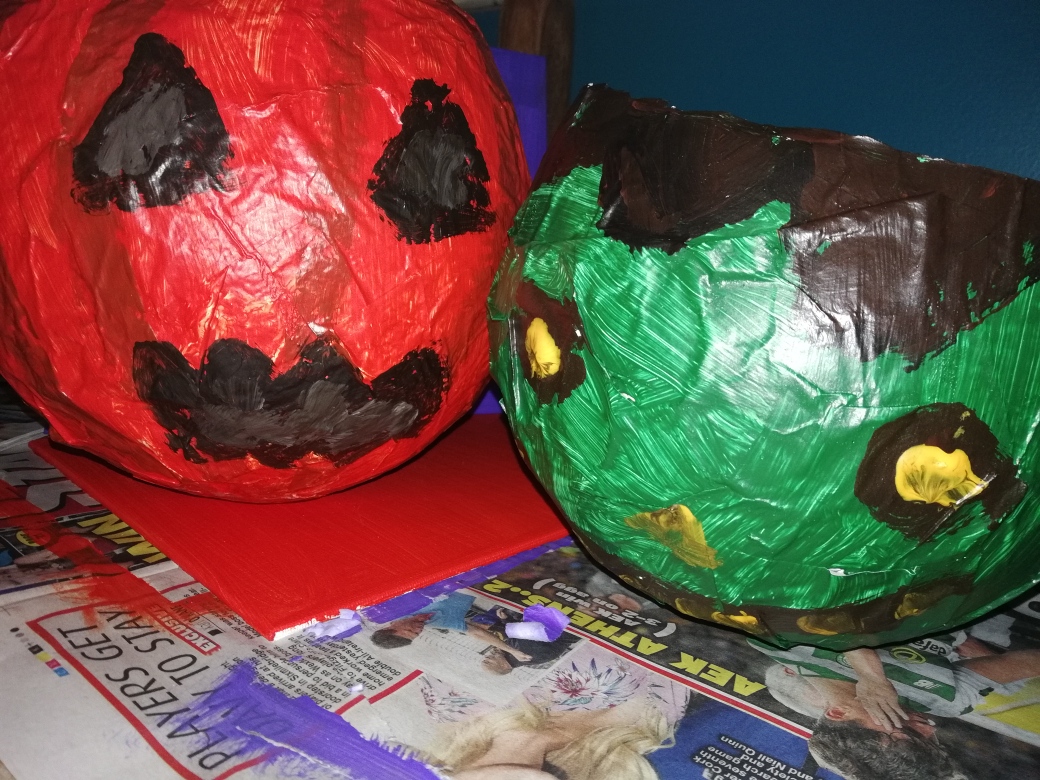
  7. Paint the bowl white (this lets the other colours you paint later on come through stronger).IMG_20181025_141434_resized_20181025_095035254
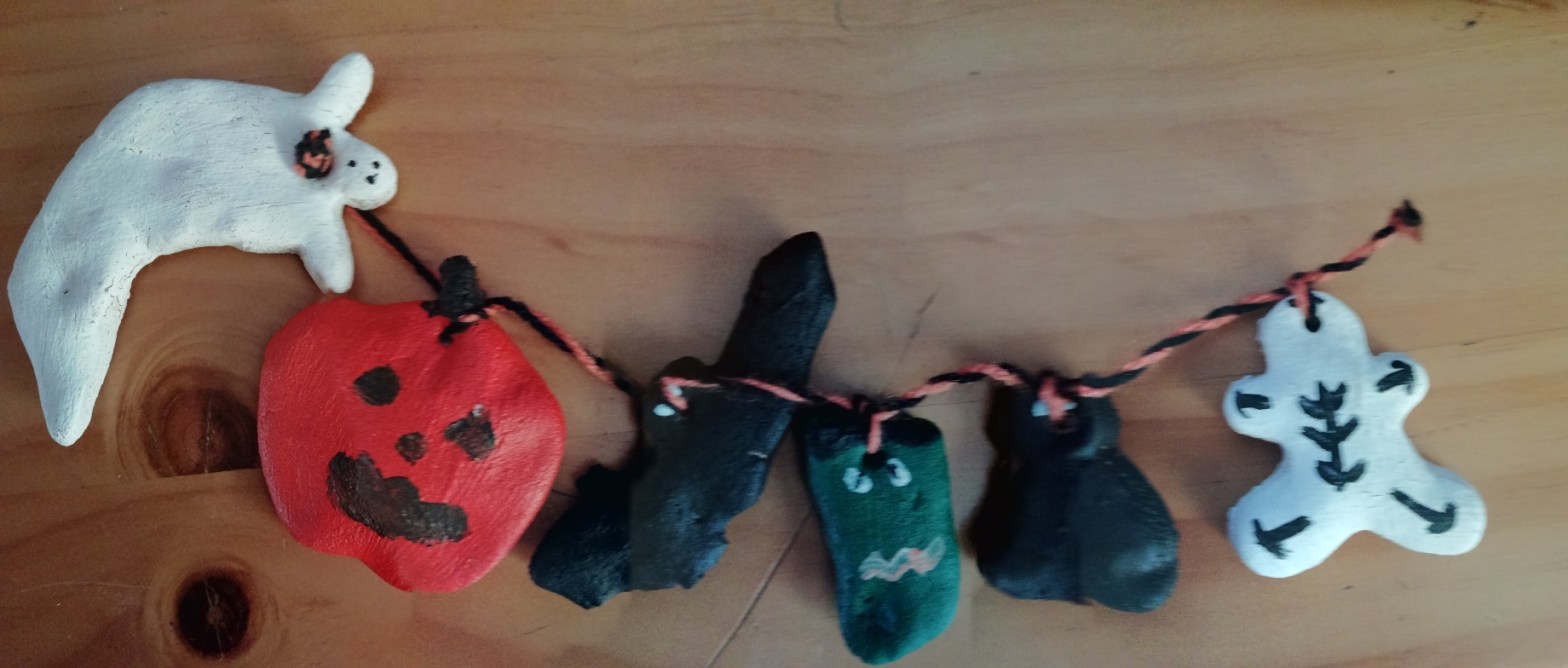
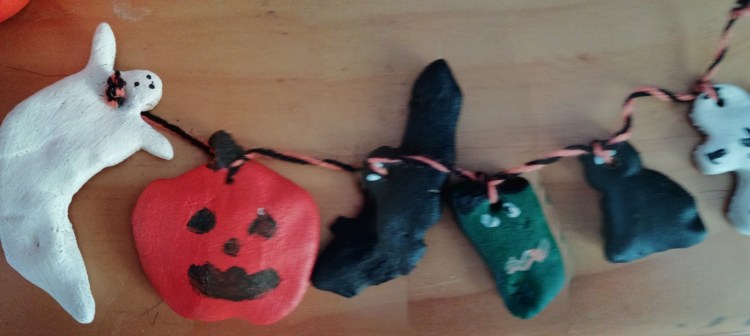
  8. When the white layer is dry, paint your base colours onto the bowl (you can choose whatever Halloween characters you want, in this case I painted 2 characters per bowl).
  9. When your base colour is dry you can then add your characters facial features.
  10. Allow to dry.

Fill with sweets & enjoy!

Graveyard Gummy Worm Cupcakes

IMG_20181024_182448_resized_20181024_104706457Ingredients:

  • 4oz flour
  • 4oz butter
  • 4oz sugar
  • 2 tsp vanilla essence
  • 2 eggs
  • Food colouring (optional)

Method:

  1. Pre-heat oven to 180 degrees (c), gas mark 4, 350 degrees (f).
  2. Cream butter & sugar together.  Then add your eggs & vanilla essence & mix well. 

  3. Fold in your flour.IMG_20181024_162654_resized_20181024_104529670
  4. Add your food colouring if you wish (this step is optional, but in this case I used purple) & mix well.IMG_20181024_170553_resized_20181024_104531418
  5. Spoon your mixture into cupcake cases.IMG_20181024_170941_resized_20181024_104528439
  6. Cook for 15 minutes.
  7. Cool on a wire tray.
  8. When your cupcakes are fully cooled you can add frosting (in this case I used chocolate frosting that I had leftover in my press).
  9. When your cakes are frosted cut gummy worms in half & place them onto your cupcake.IMG_20181024_182357_resized_20181024_104709028

Enjoy!

Monster Mash Cupcakes

IMG_20181024_181757_resized_20181024_104710875Ingredients:

Cupcake:

  • 4oz flour
  • 4oz butter
  • 4oz sugar
  • 2 tsp vanilla essence
  • 2 eggs
  • Green food colouring

Buttercream Frosting:

  • 8oz icing sugar
  • 4oz butter
  • Vanilla essence
  • Green food colouring
  • Jelly eye sweets

Method:

  1. Pre-heat oven to 180 degrees (c), gas mark 4, 350 degrees (f).
  2. Cream butter & sugar together.  Then add your eggs & vanilla essence & mix well. 

  3. Fold in your flour.IMG_20181024_162654_resized_20181024_104529670
  4. Add your green food colouring & mix well.
  5. Spoon your mixture into cupcake cases.IMG_20181024_170944_resized_20181024_104528075
  6. Cook for 15 minutes.
  7. Cool on a wire tray.
  8. To make your buttercream frosting mix together butter, sieved flour, vanilla essence & green food colouring.
  9. Pipe your buttercream on top of your cupcake.IMG_20181024_181618_resized_20181024_104709933
  10. Add your monsters eyes.IMG_20181024_181709_resized_20181024_104706898

Enjoy!

Bloody Heart Halloween Cupcakes

IMG_20181024_181221_resized_20181024_104708570Ingredients:

Cupcake:

  • 4oz flour
  • 4oz butter
  • 4oz sugar
  • 2 tsp vanilla essence
  • 2 eggs
  • Strawberry ice-cream syrup

Buttercream Frosting:

  • 8oz icing sugar
  • 4oz butter
  • Vanilla essence
  • Sweets (optional)
  • Food colouring (optional)

Method:

  1. Pre-heat oven to 180 degrees (c), gas mark 4, 350 degrees (f).
  2. Cream butter & sugar together.  Then add your eggs & vanilla essence & mix well.
  3. Fold in your flour.IMG_20181024_162654_resized_20181024_104529670
  4. Add your food colouring & mix well.
  5. Spoon your mixture into cupcake cases.IMG_20181024_163307_resized_20181024_104531937
  6. Cook for 15 minutes.
  7. Cool on a wire tray.
  8. When they are cooled cut a piece out of the centre of each cupcake. (Bakers tip: You can use a plunge cutters to this , if you do not have one a teaspoon will work as well).IMG_20181024_175643_resized_20181024_104616256
  9. In the hole add strawberry syrup, then cover the hole with some of the cupcake that was removed.
  10. To make your buttercream frosting mix together butter, sieved flour & some vanilla essence (Bakers tip: you could also add food colouring if you so wish).IMG_20181024_180549_resized_20181024_104614338
  11. Pipe your buttercream on top of your cupcake.IMG_20181024_180851_resized_20181024_104617980
  12. At this point you can add sweet hearts & strawberry ice cream syrup as fake blood.IMG_20181024_181221_resized_20181024_104708570

Enjoy!

Salt Dough Halloween Hanging Decoration or Garland

IMG_20181021_132659_resized_20181021_013138314IMG_20181023_114654_resized_20181023_114748525Ingredients/Supplies:

  • 1 cup salt
  • 1 cup flour
  • 1/2 cup water
  • Straw
  • String/ribbon/wool

Method:

  1. Pre-heat oven to 180 degrees (c), gas mark 4, 350 degrees (f).
  2. In a bowl mix your flour & salt.IMG_20181018_105452_resized_20181021_013102305
  3. Create a well in the middle of your mixture & add your water.IMG_20181018_105715_resized_20181021_013059386
  4. Mix well & knead into a dough ball.IMG_20181018_110039_resized_20181021_013058594
  5. Roll out your dough mixture.IMG_20181018_110159_resized_20181021_013101515
  6. Use Halloween cookie cutters to create your ornaments.IMG_20181018_110403_resized_20181021_013100267
  7. Using a straw poke a whole near the top of each ornament. (This is where we will thread our string/ribbon or wool later on). 

  8. Place onto a lined baking tray & bake in the oven four about an hour or until golden & solid.IMG_20181018_110711_resized_20181021_013100673
  9. When the ornaments are completely cooled, paint on your base colour. 

  10. When the base coat of paint is dry add facial features.IMG_20181020_111223_resized_20181021_013133536
  11. When they are completely dry string your ornaments onto your string/wool or ribbon as a garland or as individual hanging decorations.IMG_20181021_132618_resized_20181021_013133898
  12. There you have it, an easy Halloween decorations that all of the family can get involved in.


Halloween Bat Decoration

IMG_20181020_170033_resized_20181020_050150718
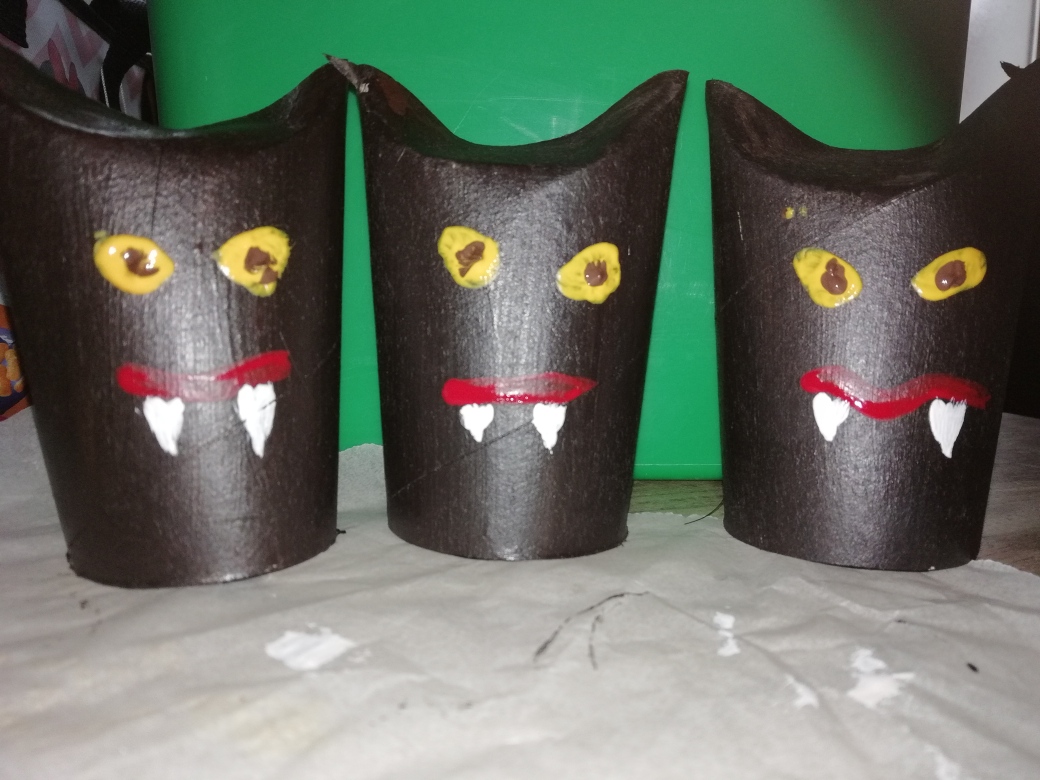
This is a great Halloween activity to do with little ones, as there is no sharp items involved just a simple painting activity & of course you can make different Halloween characters depending on the paint you use. (Some ideas: black cat, ghost,Frankenstein etc).

Supplies:

  • Paint
  • Sellotape
  • Toilet roll tubes

Method:

  1. Gather empty toilet roll tubes.IMG_20181020_133429_resized_20181020_050151087
  2. Fold over one side of the top piece of the tube.IMG_20181020_133858_resized_20181020_050148355
  3. Fold over the opposite side to resemble pointed bat ears.IMG_20181020_133905_resized_20181020_050151481
  4. Sellotape on the inside for extra support.
  5. Paint your bats in a coat of black paint and allow to dryIMG_20181020_134620_resized_20181020_050149274
  6. When your base colour is dried add your bats features such as eyes & fangs.IMG_20181020_170033_resized_20181020_050150718

Easy Peasy!

Halloween Double Chocolate Chip Cookies

IMG_20181020_135252_resized_20181020_015417601Ingredients:

  • 4 oz butter
  • 1 cup sugar
  • 1 cup  plain flour
  • 1 egg
  • 1 tsp vanilla essence
  • 1/2 cup cocoa powder/drinking chocolate
  • 1/2 tsp baking powder
  • 1 cup chocolate chips/smarties/m&ms etc (Halloween coloured sweets)
  • pinch of salt

Method:

  1. Pre-heat oven to 180 degrees (c), gas mark 4, 350 degrees (f).
  2. Cream butter & sugar together.IMG_20181020_130140_resized_20181020_015414065
  3. Beat in egg & vanilla.IMG_20181020_130318_resized_20181020_015415690
  4. Blend in your cocoa powder, flour, baking powder & salt.IMG_20181020_130548_resized_20181020_015413170
  5. Mix in your Halloween coloured sweets (I used the orange,red,yellow & green variations of M&M’s crunchy caramel , Smarties & some White Buttons). IMG_20181020_130756_resized_20181020_015416406
  6. Drop your mixture into small balls onto a lined baking tray.IMG_20181020_131349_resized_20181020_015415245
  7. Bake in the oven for 20 minutes.IMG_20181020_135237_resized_20181020_015416032

Enjoy the gooey goodness!

Pumpkin Rice Crispy Treats

IMG_20181009_160211_resized_20181009_040409361Ingredients:

  • 200g marshmallows
  • 5 cups rice crispies
  • Orange food colouring (or red & yellow)
  • 3 tbs butter

Method:

  1. Line your baking tray with parchment.
  2. Melt 3 tbs of butter in a medium sized pot over a medium heatIMG_20181009_115225_resized_20181009_040409094
  3. Add your marshmallow into the pot & mix until melted.IMG_20181009_115310_resized_20181009_040409752
  4. When they are melted remove from the heat & add your food colouring & stirIMG_20181009_115804_resized_20181009_040408419
  5. Add your rice crispies & mix well so that all of the rice crispies are coated.IMG_20181009_115903_resized_20181009_040407691
  6. Pour into your lined baking tray & flatten out.  When you have done this leave in the fridge to harden for about 30 minutes, or until fully hardened.IMG_20181009_120030_resized_20181009_040410071
  7. Use a pumpkin cookie cutter to cut pumpkin shapes out of your rice crispy treat. (or you can cut them into squares or rectangles to make rice crispy bars.)IMG_20181009_160211_resized_20181009_040409361Enjoy!

Chocolate Rice Crispy Bats

IMG_20181006_114307_resized_20181006_114407708

Ingredients:

  • Cooking chocolate (as much or as little as you want)
  • Rice crispies (as much or as little as you want)
  • Mini Oreo’s
  • Candy eyes (optional)

Method:

  1. Seperate your mini oreo’s in half & then cut each half in half.  This is how we create our bat wings.
  2. Melt your cooking chocolate, you can do this in the microwave or over a pot of boiling water.IMG_20181006_112738_resized_20181006_114410699
  3. When your chocolate is melted add in your rice crispies & mix until they are all covered in chocolate.
  4. Fill you baking cases with chocolate covered rice crispiesIMG_20181006_113639_resized_20181006_114411404
  5. Allow the rice crispy buns to harden a little & then add the wings (bakers tip: if you let the buns set a little it creates a stronger structure & will keep the wings in place better.  If you don’t allow it to set, when you put the wings in they will sink as the mixture is not yet strong enough to support them).IMG_20181006_113645_resized_20181006_114408582
  6. You can add candy eyes at this point if you wish.IMG_20181006_113652_resized_20181006_114409177

Enjoy!

Devils Chocolate Food Cake (with spiderweb frosting)

IMG_20181003_161826_resized_20181003_055138356

Ingredients Cake:

  • 4oz (110g) cooking chocolate
  • 5oz (142g) self raising flour
  • 4oz (115g) butter
  • 3oz (85g) caster sugar
  • 2oz (56g) cocoa powder/ drinking chocolate
  • 2 eggs
  • 150 ml milk
  • 1tsp baking powder
  • 1tsp vanilla essence

Ingredients Frosting:

  • 6 tbs butter
  • 1 cup cocoa powder/drinking chocolate
  • 2 1/2 cups icing sugar
  • 1/3 cup milk
  • 2 tsp vanilla essence
  • white chocolate (as much or as little as you want depending on the size of your cake.

Method Cake:

  1. Preheat your oven to about 180 degrees (c), gas mark 4, 350 degrees (f)
  2. Melt your cooking chocolate, you can do this in the microwave or in a plastic bowl over a pot of boiling water. (Bakers Tip: don’t let the bottom of the bowl sit in the water as this can burn the chocolate).
  3. Mix your butter & sugar together in a mixing bowl until creamy.IMG_20181003_141613_resized_20181003_055054435
  4. Stir in the melted chocolate, when that is mixed in add your eggs & continue mixing.IMG_20181003_142738_resized_20181003_055053776
  5. Sieve cocoa powder, flour & baking powder. Mix well 

  6. Add your milk & vanilla essence, mix well & transfer to a greased cake tin.
  7. Cook in the oven for 30 to 40 minutes. (Bakers tip: if you put a knife into the middle of the cake & it comes out clean than the cake is done.  If there is cake mixture on the knife leave it to cook for a few minutes longer, or until no cake can be seen on the knife).

Method Frosting:

  1. Beat your butter in a mixing bowl until creamy.IMG_20181003_143853_resized_20181003_055052048
  2. Add cocoa powder & icing sugar to  the bowl & mix well.IMG_20181003_144158_resized_20181003_055136498
  3. Slowly add your milk & vanilla essence.IMG_20181003_144558_resized_20181003_055137818
  4. When your cake is cooled down you can add your frosting.IMG_20181003_160627_resized_20181003_055136209
  5. Melt white chocolate the same way that you melted your chocolate for your cake.IMG_20181003_161446_resized_20181003_055139620
  6. Pour your white chocolate into an icing bag with a very thin piping nozzle.
  7. Pipe circles from the centre of the cake to the outer edge.IMG_20181003_161631_resized_20181003_055137518
  8. With a tooth pick drag out lines from the centre of the cake to the outer edge.IMG_20181003_161716_resized_20181003_055135889
  9. You can then ad a spooky little critter, I added a spider with the remaining white chocolate & gave him candy eyesIMG_20181003_161826_resized_20181003_055138356

Enjoy!

Design a site like this with WordPress.com
Get started